1 November 1942 , ninth day of Second Battle of Alamein
At the Saucer 24th Australian Brigade digs in. By dawn as sun rises Luftwaffe sweeps in to bomb their positions. RAF Desert Air Force intercepts though , Hurricanes and P-40’ies shoot down eight JU-87 Stuka dive bombers and drive rest away.
Germans shell The Saucer for a while then attack in battalion strength supported by 88 mm guns. Australians though backed this time Rhodesian anti tank guns of 1st South African Division , repulse their attack , destroy 10 German panzers , drive rest away but meanwhile 12 Rhodesian guns were also destroyed. Scores of German infantry and panzergranediers were killed or wounded in this futile attack. A lucky shot hits 24th Australian Brigade HQ , kills commanding officer Brigadier Godfrey.
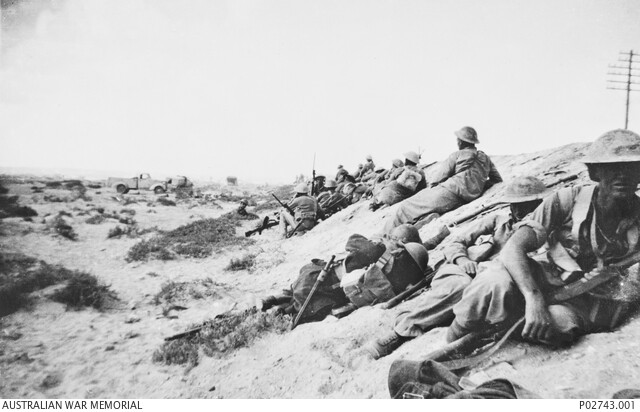
Australians at Alamein
That afternoon Rommel drives to battlefield and sees at least 30-40 wrecked British tanks , knocked out previous day. General Ritter Von Thoma warns Rommel that they have enough fuel for the moments but ammunition is getting scarce. Though fuel situation is not bright either.
By now, it had become obvious to Rommel that the battle was lost. On 1 November, two more supply ships—the Tripolino and the Ostia—had been torpedoed and sunk by RAF Beaufighters northwest of Tobruk. The shortage forced him to rely increasingly on fuel flown in from Crete on the orders of Albert Kesselring, commander of German Army Command South (OB Süd), despite the restrictions imposed by heavy bombing of the airfields in Crete and the Desert Air Force’s efforts to intercept the transport aircraft. Rommel began to plan a retreat anticipating retiring to Fuka, some 50 mi (80 km) west but still with a final effort he tries to hold his position hoping Montgomery would quit first.
All Rome has for Rommel is fatous messages like Commando Supremo Chief of Staff Ugo Cavellero sent that day : “The Duce has asked me to expres you that his appreciation for the sucessful counter attack led personally by you today. In addition Duce wished you to know that he is confident that under your leadership he is fully confident that the battle now in progress will be brought to a sucessful conclusion.”
In afternoon Rommel tried to dislodge the Australians from The Saucer once again with entire 21st Panzer and 90th German Light Division, but the brutal, desperate fighting resulted in nothing but heavy losses of men and equipment for Axis. 9th Australian Division still holds Saucer. He did however regain contact with the 125th Panzergrenadier Regiment in the nose of the salient and evacuates the Axis salient. Since Axis salient west of Alamein has been reduced The Saucer is worthless now. So Australians also withdraw and give up the Saucer.
Meanwhile during whole afternoon Montgomery is preparing his main strike. 400 British tanks along with thousands of troops mass along a 4000 yard front at southern end of Kidney ridge just across Rahman Track.
The artillery for the assault was under the operational control of the New Zealand Division artillery commander, Brigadier C.E. ‘Steve’ Weir and would fire over 50,000 shells during the four and a half hours of the attack. That weight of shells would make but a small dent in the stockpile available to Eighth Army: 110,631 rounds for 25-pounders were drawn from the railheads at El Imayid and Burg el Arab on 31 October and a further 81,044 next day. 28 The guns were to open fire at H Hour and a shell would drop every twelve yards along the opening line. Then, as the infantry closed up to that line, the bombardment would move forward in steps of 100 yards every two-and-a-half minutes. It would take the infantry onto their objectives and then do likewise for the armour. Bofors guns firing tracer rounds would mark brigade boundaries.
Intial infantry attack will be commanded by 2nd New Zealand Division but actually involve two British infantry brigades 151st Brigade from 50th Northumbrian Division and 152nd Brigade from 51st Highland Division supported by 28th Maori Battalion at their northern flank , capturing frontline enemy defences in a night attack (which Axis had trouble dealing with) They will be backed by 300 guns. The breakthough point is a 4000 yard wide and 6000 yard long rectangle and defended by 164th German Infantry Division plus Italian Trieste Mechanised Division. After gap was opened in enemy defence line 9th Armored Brigade will advance , link up and support infantry helping to keep the gap open while entire 10th Corps (1st and 10 British Armored Division) enter the gap , cut Rahman Track and capture Tel El Aquaqir hill final Axis held high ground overlooking battlefield.
To obtain maximum light from the now waning moon, the attack would begin at five minutes past one o’clock on the morning of 2 November, when the moon would have risen; thus there were only some four and a half hours for the infantry to gain their objectives, the sappers to create gaps, and the armour to pass through. Information on enemy dispositions forward of the Rahman track was sparse and called for a further artillery bombardment to cover the armour as it made its way forward through the infantry’s objectives, through the enemy gun line along the track and beyond that line.
The respective roles of infantry and armour in this operation were described by Lucas-Phillips:
“The infantry … were only a means to an end. Theirs was the task to storm the approaches to the citadel. It was for the armour to break in the gates and to destroy the enemy within. The most critical of all tasks was that designed for 9 Armoured Brigade, who were to break open the gate so long locked by the enemy’s anti-tank guns, now ranged in strength along and before the Rahman Track.”
During the evening 151st Brigade on right , 152nd on left approach their start lines. Behind them 72 Sherman and Grant tanks and 49 Crusader tanks of 9th Armored Brigade (only armored unit New Zealand Division commander Bernard Freyberg fully trusts) ready to support them. Brigadier John Currie commander of brigade is uneasy about this assault : “Sounds like another Balaclava charge” (from Crimean War when Light Cavalry Brigade Charge to Russian guns were immortalised by poems and press) he says. Behind them two armored divisions of 10th Corps. :1st and 10th Armored Divisions
As sun sets RAF Wellington , Bristol and Bleinheim bombers strike rear area of Panzer Army from north to south again , blasting supply dumps , communication centers and ammo and fuel depots. Air operations were planned on a massive scale. Once again Wellingtons would be out in force with Fleet Air Arm Albacores marking their targets. The Wellingtons were to attack the Axis armour in the northern area while medium bombers dropped some 413,000 pounds of bombs in the battle area. Night-flying Hurricanes would patrol the area and raid the Stuka base at Sidi Haneish.
British troops approach towards mark of the startline of Operation Supercharge. Troops of 9th Australian Division being relieved by them shook hands with Brits , say “Good luck mate” then retreat to rear. 151st Infantry Brigade troops made of Durham Infantry shiver in khaki uniforms. Highlanders in 152nd Brigade are better their battledress are warmer. On their backpacks each Scottish soldier wear two pieces of tape to make a makeshift St. Andrews Cross for identification in dark. At midnight British troops brew tea and wait the order to advance.
Montgomery sends a message to London and an anxious Churchill/Alan Brooke duo: “A real hard and a very bloody fight has gone on now for eight days. It was a terrific party and a complate slogging match made all more difficult since entire area is just one enormous minefield. I have managed to keep initiative throughout and Rommel complately had to dance in my tune for now. His counter attacks were handled without difficulty. I think he is ripe now for a real hard blow now which might topple him out of his perch. It is going in tonight and I am putting everything on to it”