from en wikipedia
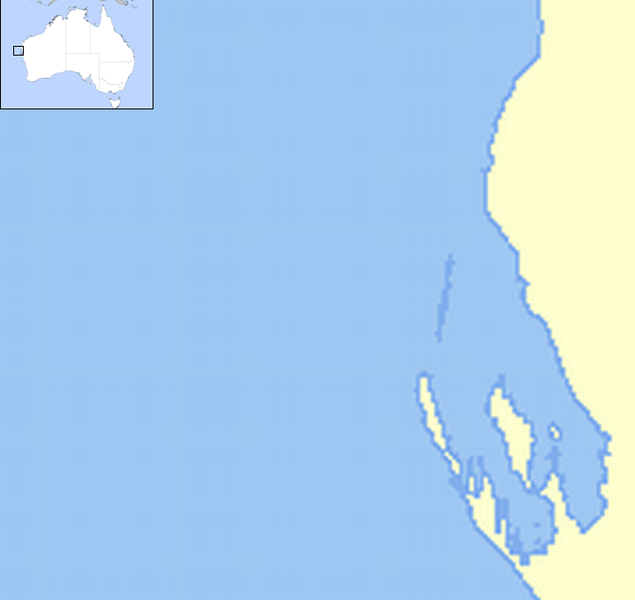
The battle between the Australian light cruiser HMAS Sydney and the German auxiliary cruiser Kormoran was a single-ship action that occurred on 19 November 1941, off the coast of Western Australia. HMAS Sydney , with Captain Joseph Burnett commanding, and Kormoran , under Fregattenkapitän Theodor Detmers, encountered each other approximately 106 nautical miles (196 km; 122 mi) off Dirk Hartog Island. Both ships were destroyed in the half-hour engagement.
From 24 November, after HMAS Sydney failed to return to port, air and sea searches were conducted. Boats and rafts carrying survivors from Kormoran were recovered at sea, while others made landfall north of Carnarvon: 318 of the 399 personnel on Kormoran survived. While debris from HMAS Sydney was found, there were no survivors from the 645-strong complement. It was the largest loss of life in the history of the Royal Australian Navy, the largest Allied warship lost with all hands during World War II, and a major blow to Australian wartime morale. Australian authorities learned of HMAS Sydney’s fate from the surviving Kormoran personnel, who were held in prisoner of war camps until the end of the war. The exact location of the two wrecks remained unverified until 2008.
Controversy has often surrounded the battle, especially in the years before the two wrecks were located in 2008. How and why a purpose-built warship like HMAS Sydney was defeated by a modified merchant vessel like Kormoran was the subject of speculation, with numerous books on the subject, as well as two official reports by government inquiries, published in 1999 and 2009 respectively.
According to German accounts—which were assessed as truthful and generally accurate by Australian interrogators during the war, as well as most subsequent analyses— HMAS Sydney approached so close to Kormoran that the Australian cruiser lost the advantages of heavier armour and superior gun range.
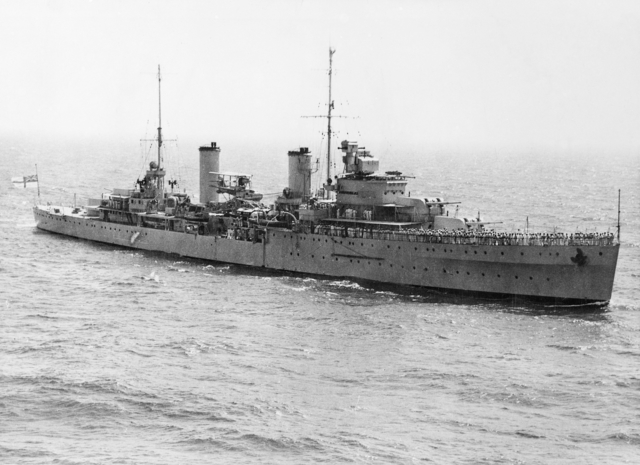
HMAS Sydney Leander Class light cruiser (one of the four cruisers entire Royal Australian Navy had in 1941)
HMAS Sydney was one of three [Modified Leander - or Perth -class light cruisers of the RAN. Built for the Royal Navy , the cruiser was purchased by the Australian government to replace HMAS Brisbane , and was commissioned into the RAN in September 1935. The cruiser was 562 feet 4 inches (171.40 m) long, and displaced 8,940 long tons. Sydney carried eight 6-inch (152 mm) in four twin turrets (“A” and “B” forward, “X” and “Y” aft) as primary armament. These were supplemented by four [4-inch (102 mm) anti-aircraft guns, nine .303-inch (7.7 mm) machine guns , and eight 21-inch (533 mm) torpedo tubes in two quadruple mountings. The cruiser also carried a single Supermarine Walrus amphibious aircraft. On 11 November, HMAS Sydney departed Fremantle for Singapore with the transport SS Zealandia. The vessels sailed to Sunda Strait, where the troopship was handed over on 17 November to HMS Durban Sydney then turned for home, and was scheduled to arrive in Fremantle late on 20 November. At the time of the battle, she had a ship’s company of 645: 41 officers, 594 sailors, six Royal Australian Air Force personnel, and four civilian canteen staff.
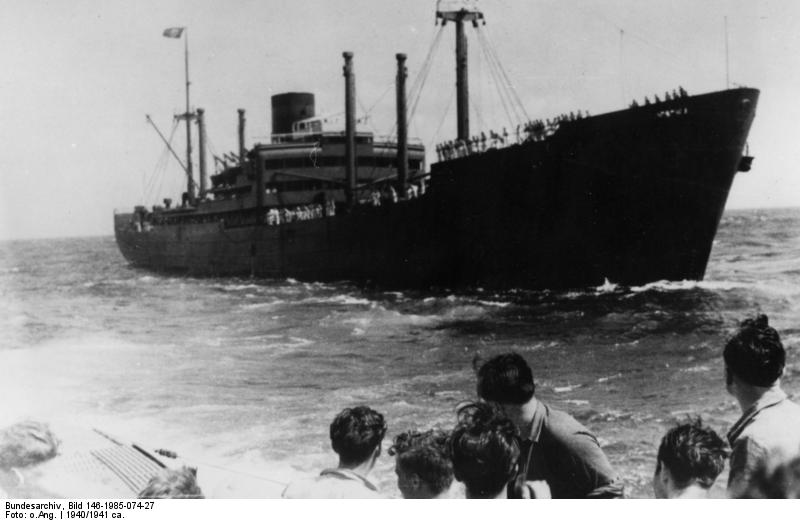
German auxilary raider Kormoram (disguised as merchant ship)
During the 1930s, disparities between the conventional warship strength of the Kriegsmarine (German Navy) and other nations caused by the Treaty of Versailles led the German military to recognise that [auxiliary cruisers] engaged in commerce raiding would be of use during future wars, and that suitable vessels should be identified. The merchant ship Steiermark was one such vessel; she was taken up by the Kriegsmarine at the start of World War II. Renamed Kormoran, she was the largest and newest of nine raiders, referred to as Hilfskreuzer (auxiliary cruisers) or Handelsstörkreuzer (trade disruption cruisers)
Kormoran was commissioned in October 1940: after modification, she was 515 feet (157 m) long, and measured 8736 grt.[21] The raider was fitted with six single 15-centimetre (5.9 in) guns (two each in the forecastle and quarterdeck, with the fifth and sixth on the centreline) as main armament, supplemented by two 37-millimetre (1.46 in) anti-tank guns, five 20-millimetre (0.79 in) anti-aircraft autocannons, and six 21-inch (530 mm) torpedo tubes (a twin above-water mount on each side, and two single underwater tubes). The 15-centimetre (5.9 in) guns were concealed behind false hull plates and cargo hatch walls, which would swing clear when the order to decamouflage was given, while the secondary weapons sat on hydraulic lifts hidden within the superstructure. The ship could be disguised as one of several Allied or neutral vessels.
Kormoran departed German waters during December 1940, under the command of Fregattenkapitän (Commander) Theodor Detmers. After operating in the Atlantic, during which time she sank seven merchant ships and captured an eighth, the raider sailed to the Indian Ocean in late April 1941. Only three merchantmen were intercepted during the next six months, and Kormoran was diverted several times to refuel German support ships. As the raider was carrying several hundred sea mines and was expected to deploy some of these before returning home in early 1942, Detmers planned to mine shipping routes near Cape Leeuwin and Fremantle, but postponed this after detecting wireless signals from a warship (Australian heavy cruiser HMAS Canberra) in the area. Instead, he decided to sail north and investigate Shark Bay. At the time of the battle, the raider was disguised as the Dutch merchantman Straat Malakka, and carried 399 personnel: 36 officers, 359 sailors, and 4 Chinese sailors hired from the crew of a captured merchantman.
Identification
On 19 November, shortly before 16:00, Kormoran was 150 nautical miles (280 km; 170 mi) southwest of Carnarvon, Western Australia. The raider was sailing northwards (heading 025°) at 11 knots (20 km/h; 13 mph). At 15:55, what was initially thought to be a tall ship sail was sighted off the port bow, although it was quickly determined to be the mast of a warship HMAS Sydney. Detmers ordered Kormoran to alter course into the sun (heading 260°) at maximum achievable speed (which quickly dropped from 15 to 14 knots (28 to 26 km/h; 17 to 16 mph) because of problems in one of her diesel engines), while setting the ship to action stations. HMAS Sydney spotted the German ship around the same time, and altered from her southward heading to intercept at 25 knots (46 km/h; 29 mph).
As she closed the gap, the Australian cruiser requested that Kormoran identify herself. Communications were initially attempted with a signal lamp to repeatedly send “NNJ” (“You should make your signal letters”), but those aboard the raider did not understand the uncommonly used signal and did not respond. HMAS Sydney continued to signal for 30 minutes, after which those aboard the cruiser used flags to send the more common “VH” signal (“You should hoist your signal letters”), while the signal lamp was used to transmit the message in plain language. After another delay, Kormoran raised “PKQI”—the call-sign for the Dutch merchant ship Straat Malakka—on the triatic stay and hoisted a Dutch merchant ensign. As HMAS Sydney was approaching from just starboard of Kormoran’s stern and 15,000 metres (49,000 ft) away, the call-sign was obscured by the raider’s funnel: German accounts vary as to if this was to further the illusion of a civilian ship, a ruse to lure HMAS Sydney closer, or an error on the signaller’s part. HMAS Sydney signalled “Make your signal letters clear”, which the signals officer aboard Kormoran did by lengthening the halyard and swinging it around to starboard. By 16:35, with HMAS Sydney 8,000 metres (26,000 ft) away, the malfunctioning engine aboard Kormoran was repaired, but Detmers chose to keep it in reserve.
Sydney asked Kormoran “Where bound?”, to which the raider responded “Batavia”. HMAS Sydney may have then made signals asking for the raider’s port of origin and cargo; the Germans who claimed this said their replies were “Fremantle” and “Piece-goods” respectively. At around 17:00, Detmers instructed his wireless operators to send a false distress signal indicating that Straat Malakka was being approached by a suspicious ship. The message, transmitted at 17:03 and repeated at 17:05, contained the distress call for a merchantman under attack from a raider instead of a warship (QQQQ, as opposed to RRRR), the latitude and longitude of the transmitting ship, the time per Greenwich Mean Time (normal practice was to transmit local time; using GMT was to let the Kriegsmarine know that the ship was actually a raider about to be lost), and the ship’s name. This signal was partially received by the tugboat Uco (“QQQQ [unintelligible] 1000 GMT”) and a shore station at Geraldton ("[unintelligible] 7C 11115E 1000 GMT"). The Geraldton station broadcast a message to all ships asking if there was anything to report (which was interpreted by the Germans as acknowledgement of their signal), but after no response was forthcoming, ignored it until a report on the signal was forwarded to the Naval Board on 27 November.
During the exchanges and distress signal, HMAS Sydney positioned herself just off the raider’s starboard beam on a parallel course, approximately 1,300 metres (4,300 ft) from Kormoran. The cruiser may or may not have been at action stations: the main guns and port torpedo launcher were trained on Kormoran and her Walrus scout plane had been readied for launch, prompting Detmers to prepare to engage Sydney, but her 4-inch (100 mm) guns were unmanned, and personnel were standing on the upper deck. During her manoeuvre, HMAS Sydney appeared to signal “IK” (the short-form for “You should prepare for a cyclone, hurricane, or typhoon”), which Kormoran did not respond to, as from their perspective, such a signal did not make sense. The Germans were unaware that the letters were the interior of the real Straat Malakka’s secret callsign, “IIKP”: to verify her identity, the ship had to signal back the outer letters. The aircraft was shut down by 17:25, and the catapult swung into the storage position; the two ships were too close for a safe launch.
At around 17:30, after the raider had failed to reply for 15 minutes, Sydney signalled by light “Show your secret sign”; Detmers knew that Kormoran was in trouble.
Action
In response to the cruiser’s signal, Detmers ordered that Kormoran’s disguise be dropped, for the Dutch flag to be replaced by the Kriegsmarine ensign, and for the guns and torpedoes to open fire. Accounts disagree on which ship fired first, but agree that both opened fire almost simultaneously. The first shots from Sydney, a full, eight-shell salvo from the main guns, were reported in most accounts to have passed over Kormoran, although some of the Germans said that shells punched through the funnel and the wireless office at bridge level without exploding, and hit the water on the far side of the raider. One analysis claims that this was either a warning shot just over the superstructure, or an attempt to destroy the raider’s bridge as a prelude to capture. With Kormoran’s opening salvo (which consisted of two shells instead of four because the raider’s two centreline guns were slower to decamouflage), the gunnery officer attempted to bracket the cruiser’s bridge but failed to hit it, with the shells striking other parts of the ship or missing completely. Two torpedoes from Kormoran’s starboard above-water tubes were launched simultaneously with the raider’s attack, and the close proximity of the target allowed the use of the anti-aircraft and close defence guns to rake Sydney’s flank, thus preventing the use of the cruiser’s secondary weapons.
Subsequent salvoes from the raider were more accurate. The second, three-shell salvo destroyed Sydney’s bridge and damaged her upper superstructure, including the gun direction control tower, wireless offices, and foremast. The fourth 15-centimetre (5.9 in) gun was ready by this time, and all four began to fire: the third and fourth salvoes knocked the cruiser’s “A” and “B” turrets out of action before they could fire a second time, and the fifth hit Sydney on the waterline in proximity to the forward engine room, although one shell hit high and destroyed the Walrus. Kormoran’s guns were aimed at Sydney’s waterline and upper deck during the next three salvoes. After the sixth German salvo, Sydney resumed fire with her aft turrets: “Y” turret fired less than four times with little effect, but multiple shots from “X” turret struck Kormoran, damaging the raider’s machinery spaces, wounding the sailors manning one of the guns,[clarification needed] and starting a fire in an oil tank.
Around the time of the eighth or ninth German salvo, one of the two torpedoes fired at the start of the engagement struck Sydney just forward of “A” turret and near the asdic compartment (the weakest point on the ship’s hull), ripping a hole in the side and causing the bow of the cruiser to angle down. After the torpedo strike, Sydney turned hard to port: the Germans assumed that the Australian ship was trying to ram them, but the cruiser passed aft. During the turn, the 10th German salvo tore the roof from “B” turret and destroyed “A” turret’s housing.
The main phase of the engagement ended around 17:35, with Sydney heading south and slowing, while Kormoran maintained her course and speed. Sydney’s main armament was completely disabled (the forward turrets were damaged or destroyed, while the aft turrets were jammed facing port, away from Kormoran), and her secondary weapons were out of range. The cruiser was wreathed in smoke from fires burning in the engine room and forward superstructure, and around the aircraft catapult.[63] Kormoran discontinued salvo firing, but the individually firing aft guns scored hits as Sydney crossed the raider’s stern.
At around 17:45, Sydney fired two torpedoes from her starboard tubes (although some Germans reported more). Prior to the torpedo launch, Detmers had decided to destroy Sydney completely and ordered the raider to turn to port so four-gun salvoes could be fired: this manoeuvre caused the torpedoes to pass astern of Kormoran. After completing the turn, battle damage caused Kormoran’s engines to fail completely, leaving the raider dead in the water while Sydney continued to sail southwards at low speed. Kormoran maintained a high rate of fire despite being immobilised—some sailors claimed that up to 450 shells were used during the second phase of the battle—and scored hits on the cruiser, although many shells missed as the range increased.[67] The raider fired her guns for the last time around 17:50, with the range at 6,600 yards (6,000 m), and a torpedo was launched at 18:00, but missed Sydney.
Conclusion
By the end of the 30-minute battle, the ships were about 10,000 metres (33,000 ft) apart: both were heavily damaged and on fire.
Sydney was proceeding on a south-south-east bearing, apparently not under control. The Australian warship quickly disappeared from German sight, although the glow of the burning ship consistently lit the horizon until 22:00, with some German survivors stating that the light was visible consistently or occasionally until midnight. Sydney sank during the night; it was originally thought that the cruiser exploded when fires reached the shell magazines or torpedo launchers, or took on water through the shellholes on her port side and capsized. However, after the wrecks were located, it was determined that Sydney was under limited control after the battle, maintaining a course of 130–140 degrees true at speeds of 1.5 knots (2.8 km/h; 1.7 mph). The ship remained afloat for up to four hours before the bow tore off and dropped almost vertically under the weight of the anchors and chains. The rest of the ship sank shortly afterward, and glided upright for 500 metres (1,600 ft) underwater until it hit the seabed stern-first.
Kormoran was stationary, and at 18:25, Detmers ordered the ship to be abandoned, as damage to the raider’s engine room had knocked out the fire-fighting systems, and there was no way to control or contain the oil fire before it reached the magazines or the mine hold. All boats and liferafts were launched by 21:00, and all but one filled: a skeleton crew manned the weapons while the officers prepared to scuttle the ship. Kormoran was abandoned at midnight; the ship sank slowly until the mine hold exploded 30 minutes later. The German survivors were in five boats and two rafts: one cutter carrying 46 men, two damaged steel liferafts with 57 and 62 aboard (the latter carrying Detmers and towing several small floats), one workboat carrying 72 people, one boat with 31 men aboard, and two rafts, each bearing 26 sailors. During the evacuation, a rubber liferaft carrying 60 people, mostly wounded, sank without warning; drowning all but three aboard. Total German casualties were six officers, 75 German sailors, and one Chinese laundryman.
When Sydney did not arrive on schedule, there was no immediate concern: the northbound journey with Zealandia could have taken longer than expected, Durban could have been late to the rendezvous, Sydney could have diverted to aid southbound merchant shipping, or minor engine problems could have occurred. Warships were expected to maintain wireless silence unless absolutely necessary; none of these were sufficient reason to break silence and inform Fremantle of the delay. When the ship failed to arrive by 23 November, wireless communications stations (initially those in Fremantle, then all high-power stations in Australia) began signalling ordering Sydney to report in.
At 06:00 on 23 November, the troopship RMS Aquitania recovered one of the two rafts carrying 26 German sailors at 24°35′S 110°57′E. Initially believing that these were survivors of a German raider attack, and that the raider might still be in the area, Aquitania resumed her voyage to Sydney, maintaining silence until the afternoon of 26 November. Detmers saw the troopship, but he did not make their boat’s presence known, as he hoped to be recovered by a neutral ship.
Six Lockheed Hudson aircraft from No. 14 Squadron RAAF, based at RAAF Base Pearce, began to search for the ship on the morning of 24 November. When it was learned that the Zealandia handover occurred on schedule, air searches commenced in the Java Sea. The first news relating to the engagement between Sydney and Kormoran was received by the Australian Naval Board during the afternoon of 24 November; the British tanker Trocas reported that she had rescued a raft at 15:00 carrying 25 German naval personnel (one having perished) at 24°6′S 111°40′E. After further communication with Trocas, the Naval Board learned that the sailors had come from the raider Kormoran, which had participated in a mutually destructive engagement with an unspecified ship, which the Naval Board assumed was Sydney.
The search was terminated at sunset on 29 November. All of the German lifeboats were accounted for: between them, 318 of Kormoran’s 399 personnel survived and reached Australian shores where they surrendered to local authorities and became Prisoners of War till 1947. Conversely, none of 645 from Sydney were found, and the only definite remains from the Australian warship were an inflatable lifebelt located by HMAS Wyrallah on 27 November (the discovery of a second RAN lifebelt by the merchant ship Evagoras that same day was initially reported, but later found to be false), and a damaged Carley float discovered by HMAS Heros on 28 November. A second Carley float, which washed up on Christmas Island in February 1942, is believed to be linked with the cruiser.
Location of battle and survivors
On 26 November, the Naval Board distributed lists of Sydney’s ship’s company to all district naval offices. Telegrams to next-of-kin, stating that their relatives were “missing as a result of enemy action” were lodged, although naval censors advised the media that no announcements relating to the cruiser be made. Despite this, rumours about the ship’s loss were circulating, fuelled by the lack of information to substantiate the “missing” telegrams. Australian Prime Minister John Curtin officially announced the loss of the cruiser during the afternoon of 30 November. Censorship restrictions on the newspapers were lifted to publish the statement, but radio stations were instructed to wait 48 hours before broadcasting the news to avoid alerting any other German ships in the area. Several Melbourne stations disobeyed, and were temporarily suspended from broadcasting. Curtin made a second announcement three days later, providing some detail of the battle.
The destruction of Sydney with all hands was a major blow to morale: it was the largest loss of life in the history of the RAN, and the ship’s company made up over 35% of RAN naval personnel killed during World War II. This was compounded by the loss of HMAS Parramatta, which was sunk by a German U-boat on 27 November; news of this was announced a day after Sydney’s fate was made public. However, the battle was not widely reported in other Allied nations, as it was a small loss compared to contemporary naval incidents — the aircraft carrier HMS Ark Royal and the battleship HMS Barham were sunk in separate incidents during the same two-week period — and was quickly eclipsed by Japan’s attacks on Pearl Harbor and Singapore in early December. Sydney was the largest Allied ship to be lost with all hands during the war.